When I mentioned to Annie Bennett that I was going to install a seawater splashdown pump, she reminded me that a watering can was a much cheaper way to go! Although I know Annie to be absolutely right not only on the cost but also on the practicality of the watering can approach, I elected to install a splashdown pump and, along the way, learned more about the inner guts of Sea Shadow than I ever would have with a watering can. After running wiring for six cabin fans, the Snake River tank monitoring system to all 3 tanks, and now the splashdown pump, I believe that the only person who knows my boat (excluding the iron beast) better than I do now is the builder.

- pump and strainer
- water intake
- running the hose
- electrical
- anchor well.

On Sea Shadow, hull #808, seawater has never been used to flush the head. I briefly thought of pulling the head intake hose and capping it off but realized I probably would forget I did this (it’s an age thing) if I ever tried to sell the boat. Instead, I cut into the head intake and installed a Y-valve – one way goes to the head (for that future, unknown owner) and the other to the splashdown pump. To access the thru-hull, I found it much easier to remove the 2 drawers in the aft cabin and do all the work through this hole. I also removed the door under the sink but even with the door gone, there was no way I was going to fit my body into such a small area and be expected to do any work at the same time. Picture 2 shows the Y-valve set-up. Note that I also placed labels on the back of the drawer so I would “remember” which way the Y-valve needs to go; the Y-valve as shown is in position to go to the pump (up and right).

Running the Hose
Running the hose turned out to be much easier than anticipated. I bought 28 feet of heavy duty, 3/4” hose that was so rigid, it could almost stand up by itself. Starting from under the starboard settee from the upper right hand corner, I pushed the hose behind the head and under the medicine cabinet far enough that it came all the way through to the hole in the aft cabin where the drawers once were. The hose was so rigid that it was almost like pushing a semi-flexible stick. That simple – nothing else, like the medicine cabinet, was removed.
I then had to cut 3 holes through bulkheads to get the hose up to the anchor well. After cutting the holes and running the hose through the holes, I became concerned with the hose, over the long term, rubbing against the holes and possibly wearing through the hose. It was then back to WM for a larger diameter hose – about 18” x 1.5” that I cut into 3 six-inch sections for “rub-guards” (for lack of a better term).
I next drilled a hole into each of the 6-inch rub-guards and threaded a very long cable tie through the hole. I then slipped the rub-guards over the hose. Next I drilled a smaller hole through the bulkhead, next to the larger hole that the hose runs through. I then threaded one end of the wire tie through the smaller bulkhead hole, into the working end of the wire tie, and pulled the wire tie snug. The rub-guards will not move and I can easily inspect them (and the wire ties) for wear at any time (which I need to remember to do). Picture 3 shows a rub-guard in place.

Electrical
According to the pump manufacturer, the pump will draw a maximum of 11 amps when initially activated. I installed a 15-amp breaker on the panel, ran wire from the breaker under the deck (a steel fish tape is a great investment), and up to the bulkhead behind the main battery switch. I then installed a separate push/pull switch on this bulkhead (see Picture #4), ran the wire through the switch, and then down to the pump.

Anchor Well
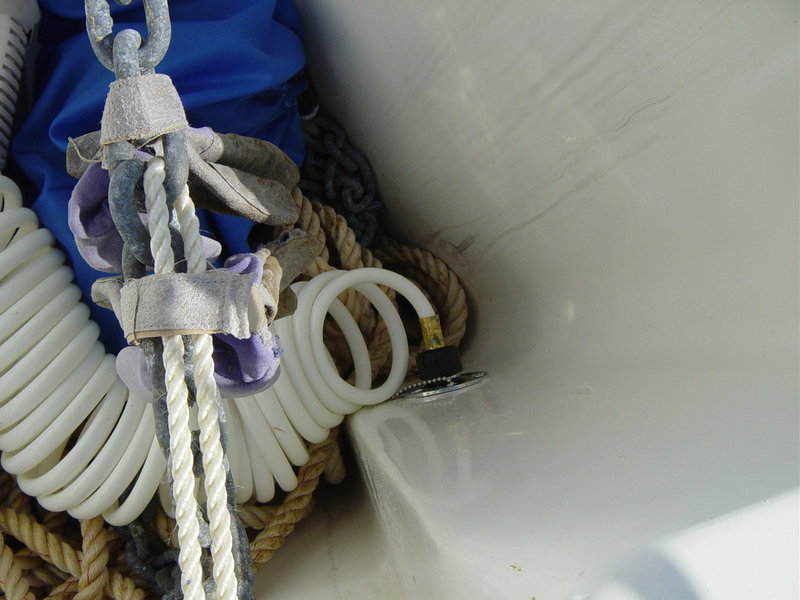
I terminated the hose at a deck fitting, mounted low and caulked, to the side of the anchor well (Picture #5). I wrestled with the best place to mount the deck fitting, recognizing that there probably is no “best place” and that others will stand by their choice of mounting place. I think that chain may eventually mar the fitting finish but doubt that it will break the fitting. I then mounted a 15-foot coiling hose with spray nozzle, opened the thru-hull, checked all fittings, turned on the circuit breaker, pulled the switch to the “On” position (note the memory label on the switch, Picture 4), opened the nozzle, and instant splashdown!
