Catalina 320 stemhead fitting sudden failure. Check your rig!
The design of the original stemhead fitting (the part that is bolted to the bow, to which the forestay attaches) lends itself to the initiation of crevice corrosion type cracks that progress through fatigue until the entire fitting gives way with a possible loss of your mast! This file shows where the crack originates, and some examples so you can better check your own rig.
This first picture shows side by side the original design (and a replacement without the side ‘gusset plates’). The left end is the part that projects upwards towards the mast and to which the forestay, or bottom of your furler) attaches…
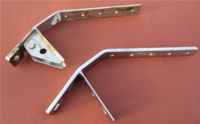
You can see that the gusset plates are welded in place to the main steel tang. Also the top (left) of the tang is doubled in thickness and I believe this is achieved by welding the second ‘square’ of metal onto the main tang, grinding smooth and then drilling the hole for the forestay attachment.
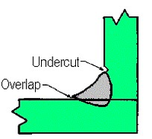
These welds, unless absolutely perfectly made, like any weld, either “bite” into the metal or slightly overlap it and thus leave a small crevice at its edge into which water will be attracted by capillary action. This is shown in this diagram and it is called undercut or overlap
Although the material is ‘stainless’ steel, the fact is that stainless steel is only corrosion resistant when it is exposed to oxygen (either in the air or contained within the water). If deprived of oxygen it can and will rust like any other steel. So-called crevice corrosion occurs because water trapped in tiny crevices become stagnant and de-oxygenated allowing rusting to begin.
Once the corrosion has started, a crack will progress through the process of fatigue, which is essentially an incremental opening up of a small crack a little bit further, every time a load is imposed upon the part. This allows further penetration of water that stagnates allowing further corrosion.
The following photo shows a crack discovered by the owner of a Catalina 36 that has the same stemhead design as the C320. Notice also on the left hand side the original weld has made an undercut that will allow crevice corrosion to begin. The weld on the right hand side has been ground flush to allow inspection.

The problem is that this area is really difficult to inspect as it is underneath the furler drum and shaded. I recommend a flashlight and maybe even a small dental mirror to really look carefully.
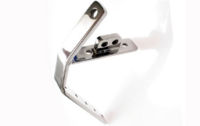
The next photo is of my own boat which shows a hairline crack originating from the top of the weld. I will be getting further inspections/repairs carried out immediately.

The final photo shows the same part (from a friend’s C320) after it fractured whilst they were at sea in only moderate winds. They were fortunate not to lose the mast! This photo clearly shows the progression of the crack over time, demonstrated by the series of circular lines like waves on a shoreline. The older parts – nearest the weld where the crack started, are the rustiest having being exposed to corrosion for longer. The crack emanated from both sides and the T-shaped nonrusty part in the middle was the final failure under load, when it gave way.
The small vertical ‘nick’s or ‘notches’ visible at the right hand side are also classic signs of fatigue progression.

In my opinion the design of this plate lends itself to this type of failure because of the welding and difficulty in inspection. It is worth noting that Catalina Direct (with whom I have no commercial or other connection) offer a replacement that does not have the side plates, but a central lug instead.
Points to take away:
1. Inspect your rig carefully and regularly.
2. Flush with fresh water as often as you can after sailing in saltwater (this will slow down but not completely prevent crevice corrosion).
From Graeme Clark, Hull # 366, built 1996