I installed the Acu Gage Ultra 8 tank monitoring system and wanted to share what I think may have been a unique way of installing on the forward water tank, plus other things learned.
First, I would strongly suggest that anyone wishing to purchase and self-install such a system contact Dennis Ferriello (Dennis@snake-river.org) before proceeding further. He is easy to work with and has years of experience with the system. I especially liked the fact that Dennis ensured that the product delivered was factory programmed for my boat. The welcome screen says, "Sea Shadow, Catalina 320" and the next three screens note in words of my choosing which tank is being monitored. There will be more on Dennis later.
To get the wiring to the forward tank, I ran through the port settee, following the chase for the water line, using a steel fish tape.
On Sea Shadow, hull #808, getting the foils down the forward part of the tank was not possible. On the aft side of the tank, there was about 1/2 inch clearance between the retaining bulkhead and the plastic tank. I simply could not find an adequate way of getting the glue down the side of the tank, then getting foils down to the bottom of the tank, then getting the bubbles out of the foils, and then finally getting the module attached to the foil. See picture 1.
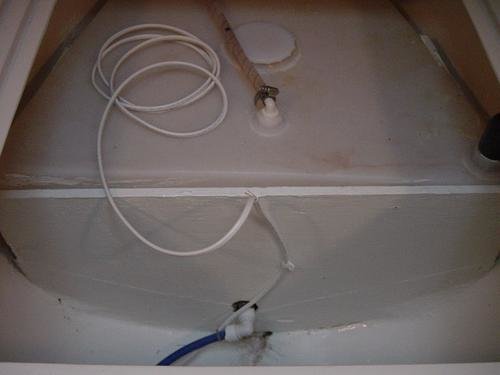
Picture 1 – The retaining bulkhead against the aft end of the tank. Note the marginal clearance between tank and bulkhead.
The solution was to cut a window out of the retaining bulkhead and when finished, screw a piece of plywood over the window to return the structural integrity to the bulkhead. I first tried using a jig saw with a blade cut off sufficiently so that on the down stroke, it would not touch the tank. The problem with this was that on the upstroke, the blade was too short to remain in the cut. I then tried a laminate trimmer (because one was available for borrow from my son-in-law). The laminate trimmer makes short work of vertical cuts. The problems with the laminate trimmer were that it is impossible to control, the cut is so large that I will be still vacuuming up saw dust at 10 o\’clock next summer, and, due to the lack of control, a horizontal cut in the neighborhood of the outflow fitting was not somewhere I was willing to go. Keep in mind that I wanted to get the window to the top of the outflow fitting. See picture 2.
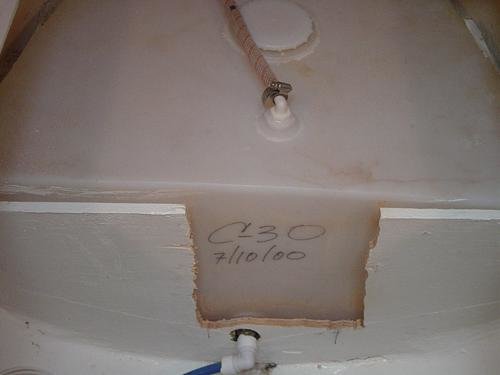 Picture 2 – The window has been cut.
I finally broke down and bought a Dremel saw complete with a cutting depth gauge as a superb feature. At my age I should not continue to be amazed at how easy a job can be when one has the right tools… but I was! The Dremel was the absolute perfect tool and made short, sure work of the project. In fact, I used the Dremel to cut the hole in the panel to install the monitor itself and this hole was the most perfect hole I have ever cut on a boat. To digress, my next project is a splashdown pump and I see the Dremel being used for that project as well.
Once the window was cut, the foil and sensor installs were the easiest of the 3 tanks. Picture 3 shows the foils and sensor installed to the bottom of the tank and picture 4 shows the piece of plywood added back and the finished product. Note that the plywood can easily be removed for access to the wiring, foils, and sensor for future service or repair.
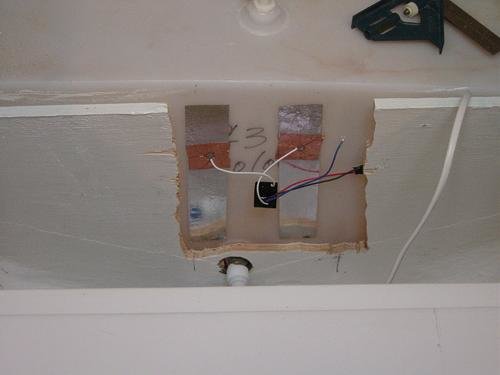 Picture 3 – Foils and sensor installed.
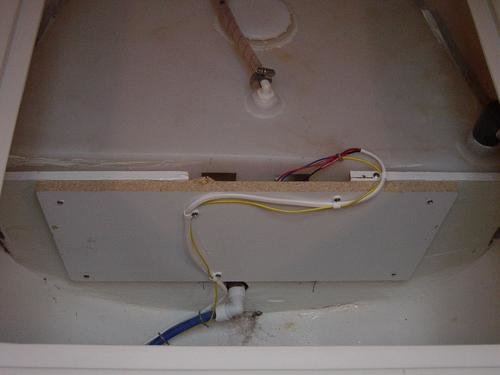 Picture 4 – Finished product.
For the aft water tank, I was able to fish the wire from the port settee, under the deck and refrigerator, and out to the water pump under the aft bunk, port side. From there, it was a simple matter to run the wire over to the water tank on the starboard side. I then removed the two braces on this tank and, very carefully, gently shifted the tank to starboard while lifting up at the same time. I was surprised at how easily the tank moved and left more than sufficient room to cleanly install the foils and sensor at the lowest part of the tank.
The waste tank should be the easiest of the tanks to complete, as nothing needs to be removed or moved. As with everything on a boat however, I managed to do this tank the hard way. I installed the foils directly over the outflow fitting so although the fit was tight for my clumsy hands, I got them in. When I got to the sensors – same tight fit – I managed to break one. A panic-call to Dennis resulted in a rehabbed sensor arriving by mail in two days at no cost. I then returned the broken sensor to Dennis for rehab and availability for the next do-it-yourself challenged sailor.
Calibration of the monitor was simple : calibrate each tank empty, fill the tank, calibrate full and it is done.
Prior to installing the Acu Gauge, whenever a tank ran dry and I closed that one off and opened the full tank, I had to prime the pump by sticking my mouth over an open faucet and sucking water through. What the monitoring system taught me was that the forward tank fills the aft tank. In other words, say I am running off the aft tank and the forward tank is closed off. Once the aft tank is empty, I would open the forward tank but NOT close off the aft tank. It would take 30-45 minutes but the forward tank would eventually fill the aft tank and, at the same time, restore pressure to the pump. By using this method, I never had to suck water through the faucet again.
Later, I upgraded the water pump to a Sensor Max VSD that gives constant water flow, is very quiet with no hammering, and is self-priming. In addition, I found that I had no need for an accumulator tank. Since installing this pump, I have left both tank shutoffs in the open position, monitor the tank levels (as long as the forward tank has any water, the aft tank is always full), and simply fill the forward tank when required. No more climbing under the aft berth to find the shutoffs plus the project of moving the shutoffs to under the galley sink was eliminated from my Sea Shadow To Do List!
Allan S. Field
Sea Shadow – #808
Herrington Harbour South
Rosehaven, MD